Welcome »
Warm-up and cool-down
Posted by Cyril Grither on June 4, 2023
Your exercise session should include a warm-up exercise, an aerobic exercise, and a cool-down exercise.
Warming up
A warm-up period includes any light exercise – ideally, a lighter version of the planned exercise. If you are going to walk, start by walking slowly; If you are going to swim, swim at a slow pace. You should warm up over a period of approximately 10 minutes to reach the desired intensity. If you're prone to angina when you exercise, you may want to warm up longer.
Warm up, why
- To gradually increase your heart rate until it reaches an aerobic level.
- To prepare your heart and muscles for exercise.
- To reduce symptoms when you exercise.
- To reduce the risk of heart rhythm irregularities.
- To help prevent injuries.
Aerobic exercise
Aerobic-type activities force the heart, lungs and muscles to improve their function. Walking, cycling and swimming are just a few examples of aerobic exercises you can do. During this exercise session, your heart rate should be elevated or it should feel like you are exercising at medium intensity or higher for an extended period of time. Ideally, your session should last at least 30 minutes.
Recovery
The cool-down exercise should be similar to the warm-up exercise and last 5 to 10 minutes or until you have regained normal breathing. This is also a great time to do some light stretching.
A recovery exercise, why
- To gradually slow down body systems, especially heart rate and blood pressure.
- To help reduce the possibility of symptoms and heart rhythm irregularities.
- To help prevent injuries.
Aim for 10 minutes of warm-up, 30 to 60 minutes of aerobic activity, and 5 to 10 minutes of cool-down most days of the week.
Appendix 1: stretching exercises
- Perform the movement gradually until you feel the stretch, without feeling pain.
- Each stretch should last 15 to 30 seconds. Repeat the movement up to 4 times so that each muscle is stretched for a total of one minute.
- Breathe normally, do not hold your breath.
- Maintain each position while remaining completely still.
- For some exercises, you will have the choice between standing or sitting. Adopt the position that suits you best.
- You may not be able to complete all the stretches. If your surgeon, cardiologist or other healthcare professional has advised you to avoid certain movements, follow their recommendations and consult us if you have any doubts or questions.
CALF STRETCHES (STANDING)

- Stand in front of a wall, one leg behind the other, feet shoulder-width apart, toes forward.
- With your hands supported on the wall, slightly bend the knee of your front leg, keeping your heels on the floor, and lean toward the wall, straightening your back leg until you feel a stretch in your calf.
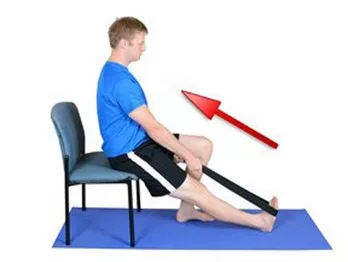
CALF STRETCHES (SITTING POSITION)
Pull your foot with the towel
keeping the knee straightened.
- Stretch one leg out in front of you.
- Wrap a long towel around the top of your foot and hold one end of the towel in each hand.
- Pull the towel toward you, keeping your knee straightened, until you feel a stretch in your calf.
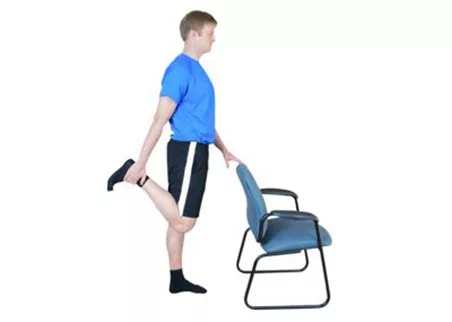
QUADRICEPS STRETCHING (STANDING)
Bring your heel closer to your buttocks
avoiding arching the back.
- Stand with one hand resting on a chair, wall or counter.
- Place your weight on one leg and bend the opposite knee to grip your ankle with the hand on the same side, then gently pull toward your butt until you feel a stretch in your thigh.
- Make sure your knee is pointing toward the floor.
- Avoid leaning backwards.
- If you have trouble reaching your ankle or can't stand up, wrap a towel around your ankle and pull the ends of the towel.
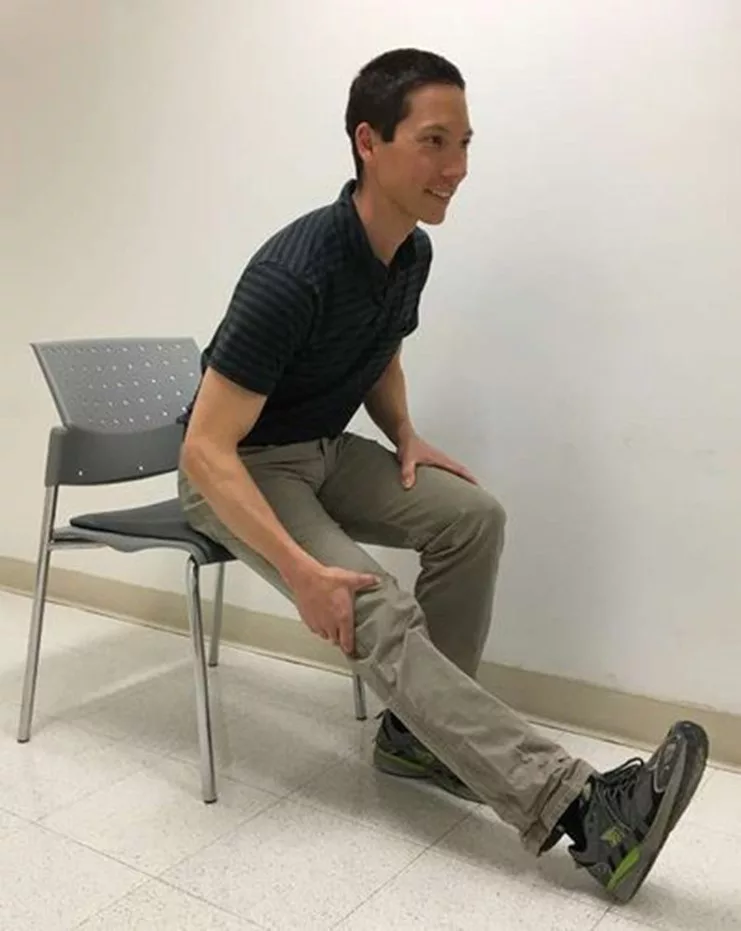
QUADRICEPS STRETCHES (SITTING POSITION)
Slide your knee back until
you felt a stretch in your thigh.
- Sit on the side edge of a chair and slide one leg sideways, slightly outside the chair.
- Place the tips of your toes on the floor and slide your knee back until you feel a stretch in your thigh.
- If necessary, place your knee on a pillow or block.
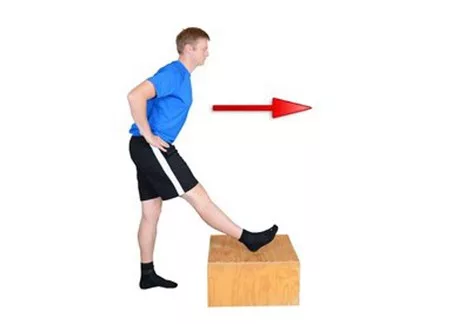
HAMSTRING STRETCH (STANDING)
Lean forward while folding
the joint of your hips.
- Place one heel on a low stool in front of you.
- If necessary, hold on to a chair, counter or wall to maintain your balance.
- Keep your back straight and gently lean forward, bending at your hip joint, until you feel a stretch in your back thigh.
- Make sure to keep the knee of your front leg straightened.
HAMSTRING STRETCH (SEATED POSITION)
- Sit on the front edge of a chair and extend one leg in front of you with your heel on the floor, toes toward the ceiling.
- Keep your knee straight.
- Lean forward by bending your hip joint, keeping your back straight, until you feel a stretch in your back thigh.
- Do not push on your knee with your hands to unfold it.
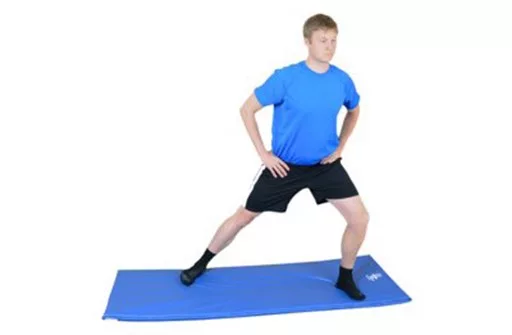
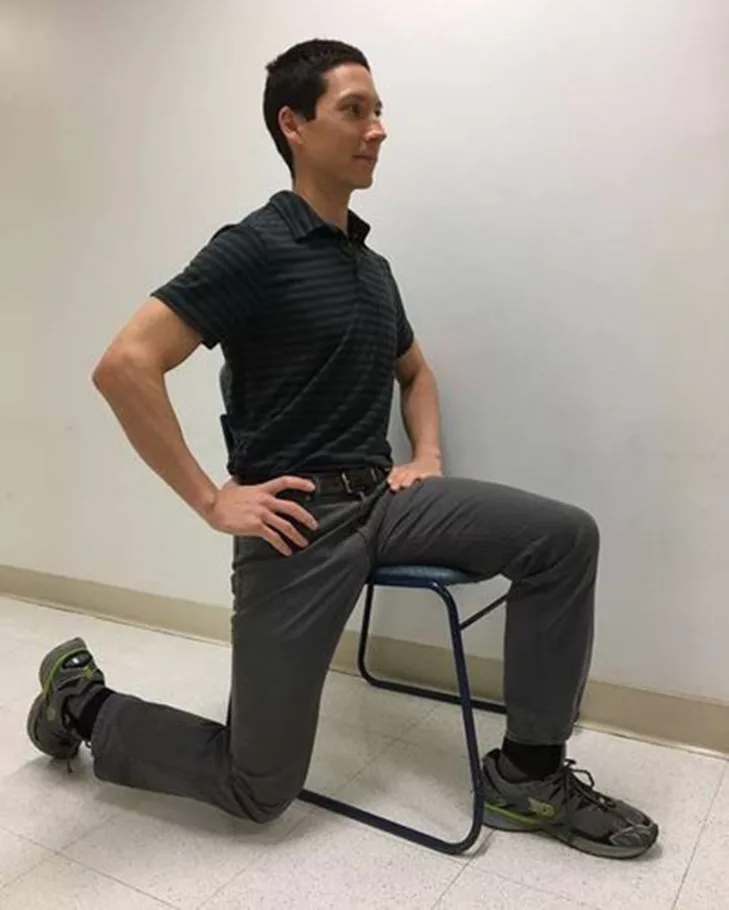
STRETCHING THE INNER THIGH MUSCLES
Extend your leg out to the side until you feel a stretch.
- Adopt the lunge position as shown.
- The leg extended to the side should be slightly behind you and both feet flat, with your toes pointed forward.
- Keeping your back straight, extend your leg further out to the side until you feel a stretch in your inner thigh.
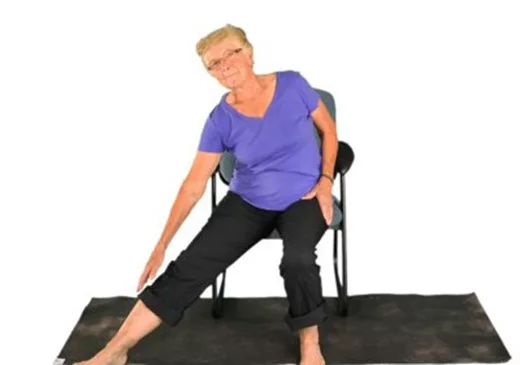
STRETCHING THE INNER THIGH MUSCLES (SITTING POSITION)
Try to reach your toes.
- Sit on the edge of a chair (easier if there are no armrests)
- Extend your leg out to the side, keeping your toes pointed forward.
- Lean to the side and reach for your toes, keeping your shoulders straight, until you feel a stretch in your inner thigh.
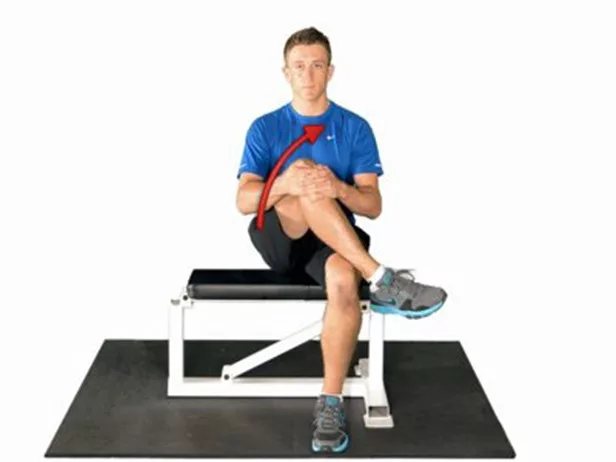
HIP STRETCH
Bring your knee closer to your shoulder
opposite.
- Sit with your back straight.
- Cross your legs as shown.
- Using your hands, pull your knee toward your opposite shoulder until you feel a stretch in your hip and buttock.
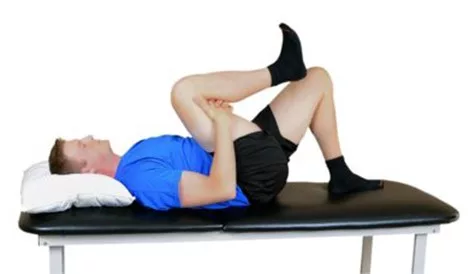
LOWER BACK STRETCH (KNEE TO CHEST)
Bring your knee closer to your chest.
- Lie on your back with your knees bent and your feet flat.
- Bring one knee to your chest.
- Place your hands under your thigh and pull towards you.
- Repeat the movement with the other leg.
- If you are comfortable, you can do this movement with both legs at once.
- Make sure you don't hold your breath.
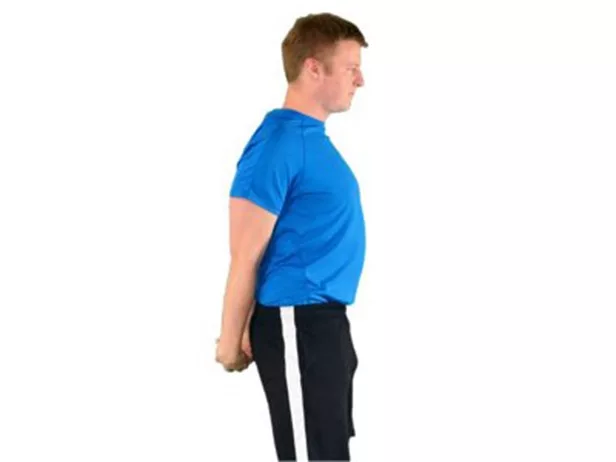
FRONT SHOULDER STRETCH
Clasp your hands behind your back and
spread your arms away from your buttocks.
- Stand with your back straight and your shoulders relaxed.
- If necessary, you can sit on a seat without a backrest.
- Clasp your hands behind your back, crossing your fingers.
- Without bending your elbows, raise your arms away from your buttocks until you feel a stretch in the front of your shoulders.
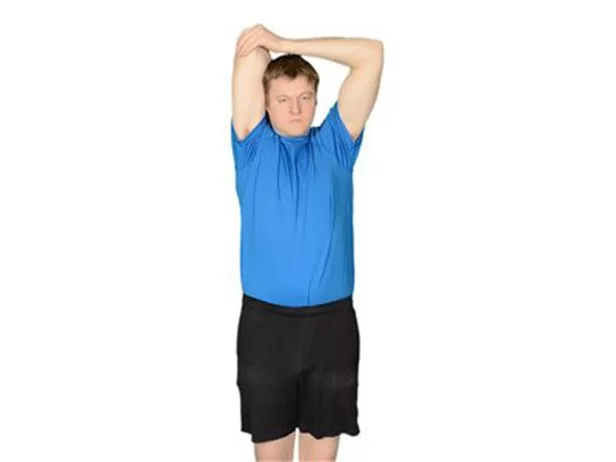
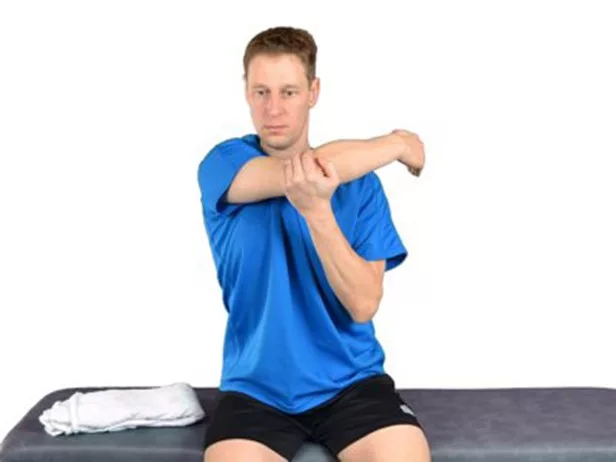
TRICEPS STRETCH
Push or pull your elbow back.
- Bend your elbow so that your hand comes down behind your head.
- With the other hand, grab the elbow of the bent arm and push or pull it behind your head until you feel a stretch in the back of the arm.
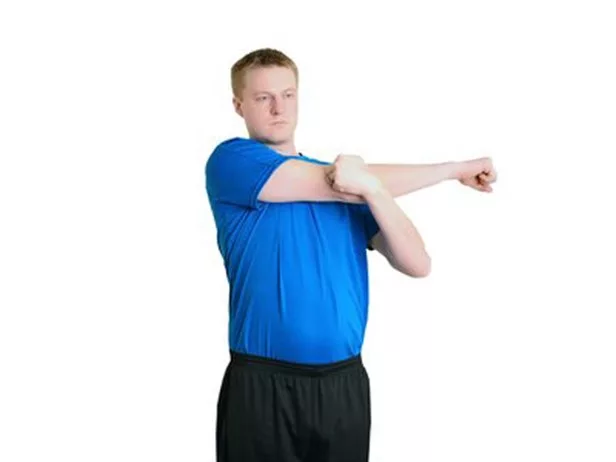
BACK SHOULDER STRETCH
Pull one arm across your chest.
- Stretch one arm across your chest.
- Grasp your elbow with the other hand and pull toward your opposite shoulder until you feel a stretch in the back of your shoulder.
POSTERIOR SHOULDER STRETCH
Place your arm in front of your chest.
- Place one hand behind the opposite shoulder, placing your arm in front of your chest.
- Use the other hand to push on your elbow toward the opposite shoulder until you feel a stretch in the back of your shoulder.
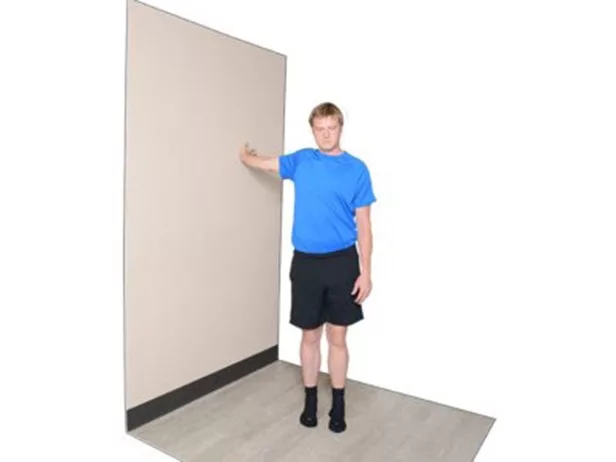
PECTORAL AND SHOULDER STRETCH
Without bending your elbow, turn around
direction away from the wall.
- Stand upright, an arm's length from a wall.
- Place one hand against the wall at shoulder height.
- You can also use the edge of a wall or the frame of a door.
- Without bending your elbow, turn away from the wall, holding your arm behind you until you feel a stretch in the front of your shoulder and in your pecs.
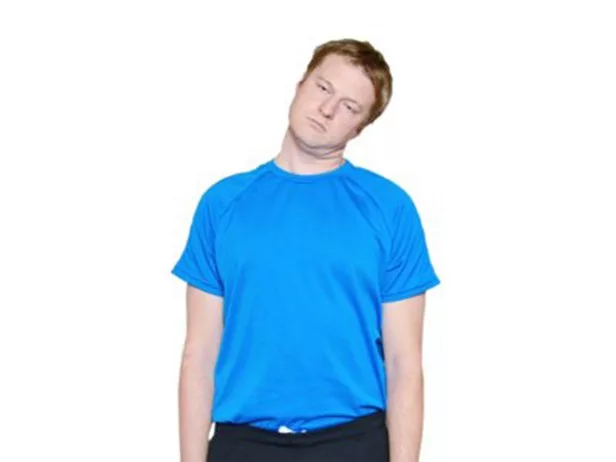
LATERAL NECK STRETCH
Tilt your head to the side while keeping
tucked chin
- While sitting or standing, stand with your back straight and your shoulders relaxed.
- When sitting, hold on to your seat to help you relax your shoulders.
- Standing, you can clasp your hands behind your back to help you relax your shoulders.
- Tuck your chin in slowly (as if to say yes).
- Lower your ear toward your shoulder until you feel a stretch on the opposite side of your neck.
Appendix 2: exercises with weights/dumbbells
- In these exercises, weights or dumbbells create resistance.
- You can do most of them standing or sitting.
- Stand with your feet shoulder-width apart and keep your knees straight, without locking them.
- Make sure your back is straight; Avoid leaning forward or arching your lower back.
- For many exercises, we recommend performing the movement one arm at a time to decrease the level of effort. You can therefore repeat the movement on one side, then switch to the other arm or alternate the movements (right-left).
- You may not be able to complete all the exercises. If your surgeon, cardiologist or other healthcare professional has advised you to avoid certain movements, follow their recommendations and consult us if you have any doubts or questions.
- Aim for one to three sets of 10 to 15 repetitions.
- Exhale during the effort and inhale as you return to your starting position.
ARM ELEVATION (FRONT)
- Hold the weight at hip height.
- Keep your elbow straight and your shoulders relaxed.
- Palm facing in or the floor, not the ceiling
- Raise your arm to shoulder height.
- Return the weight to the starting position.
- Do the exercise with the other arm, repeat, alternating arms.
ARM ELEVATION (SIDE)
- Hold the weight at hip height.
- Keep your elbow straight and your shoulders relaxed.
- Palm facing in or the floor, not the ceiling
- Raise your arm to shoulder height.
- Return the weight to the starting position.
- Do the exercise with the other arm, repeat, alternating arms.
SHOULDER PRESS
- Hold the weight at shoulder height, elbows bent.
- Extend your arm toward the ceiling to lift the weight.
- Slowly return to your starting position.
- Repeat the exercise with the other arm, starting again alternating arms.
HORIZONTAL DUMBBELL DRAW
- Place one hand and one knee on a bench or chair.
- If this position is not comfortable, stand and place one forearm on the back of a seat or counter to stabilize your upper body.
- In the latter case, place one foot in front of the other and lean your torso forward.
- In a seated position, place one forearm on your thighs or a table in front of you.
- Hold the weight at the end of your outstretched arm.
- Bring your shoulder blades together.
- Bend your elbow and raise it slightly higher than your back.
- Slowly return to your starting position.
- Perform one set on one side, then do the same with the other arm.
ELBOW EXTENSION (TRICEPS)
- Place one hand and one knee on a bench or chair.
- You can also repeat the other positions described in the previous exercise.
- Hold the weight in one hand with your elbow bent against your trunk.
- Unbend your elbow to extend your arm behind you.
- Slowly return to your starting position.
- Keep your elbow against your core during repetitions.
ELBOW EXTENSION (OTHER OPTION)
- Hold the weight in one hand behind your head with your elbow bent.
- Straighten your elbow, lifting the weight above your head.
- Bend your elbow to return to your starting position.
ELBOW FLEXION (BICEPS)
- Hold the weight at hip height.
- Face the palm of your hand toward the ceiling.
- Bend your elbow so that your hand is placed on your shoulder.
- Slowly return to your starting position.
TRUNK DEVELOPMENT
- Lie on your back with your feet flat on the floor.
- If you don't have a bench, lie down on the floor or a bed.
- Holding a weight in each hand, place your arms on either side of your chest, palms vertical, elbows bent at the sides.
- Slowly lift the weights, fully extending your arms toward the ceiling.
- Slowly return to your starting position.
SHOULDER SPACING
- Lie on your back and place your feet flat on the floor.
- If you don't have a bench, lie on the floor or bed with your feet flat.
- Hold a weight on each side, arms crossed, elbows slightly bent.
- Lock your elbows in position
- slightly bent and operate your shoulders to bring the weights together above your chest.
- Slowly return to your starting position.
- If you are using a bench, do not go lower than shoulder height.
Appendix 3: strengthening exercises (trunk muscles)
- The muscles of the trunk (from the rib cage to the pelvis) support and stabilize our body when it is moving.
- Strengthening the core muscles improves posture, prevents or reduces back pain and increases sports performance.
- Many exercises do not require any special equipment.
- Most of these exercises involve repetitions like those you did with weights or bands. However, in these exercises, the resistance comes from your body weight; you will therefore need to adjust the range of your movement to increase or decrease the degree of difficulty.
- In some cases, you may be able to hold the position longer to increase the level of difficulty of the exercise. Start with a few seconds, then increase the duration.
- Make sure you don't hold your breath while you hold a position.
- You may not be able to complete all the exercises. If your surgeon, cardiologist or other healthcare professional has advised you to avoid certain movements, follow their recommendations and consult us if you have any doubts or questions. You usually have to wait two or three months after open heart surgery before you can get on your knees and support yourself on your hands.
PELVIS TILTING
- Lie on your back, knees bent and feet flat, arms extended at your sides, palms of your hands on the floor.
- In this position, many people will feel a slight space between their lower back and the floor.
- Contract your lower abdominals (lower stomach muscles) to press your back to the ground.
- Hold the position without holding your breath.
- Return to your starting position; you may feel your lower back lifting off the ground.
- Once you have mastered this exercise while lying down, you can apply it to other positions to protect your back, especially when lifting objects.
- You can increase the difficulty of this exercise by moving your legs while keeping your back flat on the ground. Contact us to learn more about how to do this.
PARTIAL RECOVERY
- Lie on your back with your knees bent and your feet flat.
- Extend your arms and place your hands on your thighs.
- Contract your abs and lift
- your shoulder blades and upper back by sliding your hands along your thighs.
- Slowly lower your shoulders to the floor.
- You can place your hands under your head to lighten its weight, but make sure not to pull forward so as not to strain your neck.
PARTIAL STRAIGHTENING (SITTING POSITION – EASIER OPTION)
- Perform this exercise if the lying version is too difficult for you.
- Sit with your back straight and your hips at the edge of a sturdy chair.
- Contract your abs and slowly lean back, tilting your pelvis to let your spine curl.
- Lean toward the back of the seat as much as possible, controlling the movement throughout.
- Return to your starting position, back straight and shoulders vertical to the hips.
BRIDGE
- Lie on your back, arms at your sides.
- Bend your knees and place your feet flat.
- Lift your hips to form a bridge.
- Slowly return to the starting position
- To make the exercise more challenging, stretch one leg after lifting your hips.
HALF BOARD
- Place yourself on your knees with support on your hands, shoulders and hips at a 90-degree angle.
- Tilt your pelvis as in the picture to keep your back straight.
- Simultaneously extend one arm in front of you and the opposite leg behind you.
- If your abs are tight, you should not be able to lift your leg above hip height.
- Rest the arm and leg.
- Repeat the movement with the opposite arm and leg.
- If you can't kneel, lie face down on a cushion long enough to support your core (from your chest to your hips).
LATERAL LEG RISE (LYING POSITION)
- Lie on your side with your bottom leg bent and your top leg straight.
- Lift your straight leg toward the ceiling until your foot is just above shoulder height.
- Make sure your foot is pointing forward, not toward the ceiling
- Slowly lower the leg.
- If this exercise is too difficult, opt for the standing position of this exercise.
LATERAL LEG RISE (STANDING – EASIER OPTION)
- Stand with one hand resting on the back of a chair or counter for support.
- Raise the opposite leg out to the side, keeping the knee straight and toes pointed forward.
- You should limit the movement so that you do not lean to the side or bend your trunk.
- Slowly return to your starting position.
- You can also perform the exercise with an elastic band.
SQUAT
- Stand with your feet shoulder-width apart, toes pointed forward.
- Place more weight on your heels than on your toes.
- Squat down (bend your hips and knees).
- Keep your back straight, knees over your toes and head straight.
- Go as low as possible without feeling discomfort.
- Return to your starting position.
- If necessary, hold on to the back of a chair in front of you to maintain your balance.
- Use weights to increase the difficulty of the exercise.
FORWARD LUNGE
- Stand upright with your back straight.
- Take a big step forward.
- Bend both knees to go as low as possible.
- Make sure you don't feel any discomfort.
- Place more weight on the heel of your front foot.
- It is easier to repeat the movement several times with the same leg and then switch legs than to alternate each time.
- As you progress, you can alternately perform the movement by returning the front foot to its starting position before repeating the movement with the other foot.
- If necessary, hold on to the back of a sideways chair to maintain your balance.
- Use weights to increase the difficulty of the exercise.
PLANK
- Lie on your stomach, arms close to your body, elbows bent.
- Lift yourself up onto your forearms and toes to make the plank as straight as possible.
- Contract your abdominals well and avoid arching your back.
- Breathe normally while you hold the position.
- As your endurance increases, you will be able to hold the position longer.
- If the exercise is too difficult, place your weight on your knees rather than your toes.
- You can also distribute your weight on your hands, elbows straightened, and knees, rather than on your forearms and toes.
GROUND PUMPS
- Lie on your stomach with your hands on either side of your shoulders.
- Push through your hands and toes to lift yourself up into a plank.
- Slowly return to your starting position.
- If the exercise is too difficult, get down on your knees.
- If you can't do this or have recently had open heart surgery, start by doing your push-ups while standing against a wall.
WALL PUMPS (EASIER OPTION)
- Wear shoes that will not slip or go barefoot.
- Stand an arm's length from a wall with your palms on the wall at shoulder height.
- Contract your back muscles, abdominal muscles and gluteal muscles.
- Form a straight plank from head to toe.
- Lean forward to get closer to the wall, controlling the movement with your arms.
- Touch the wall with your nose.
- Push up on your arms to slowly return to your starting position.
Appendix 4: exercises with band/elastic
- These exercises are performed with rubber bands or resistance bands.
- The thickness of the elastic or band will determine the level of resistance. Depending on the brand, the different colors indicate the degree of resistance.
- Some bands have handles that make them easier to handle.
- The majority of these exercises can be performed standing or seated.
- Be sure to always control the elastic or band; go slowly as you move it away from your body and return to your starting position. Never let them rattle.
- The length of the band from its anchor point to your hand or foot will determine the degree of difficulty of the exercise; The shorter you make the band, the more difficult the exercise will be.
- It is more convenient to perform a band exercise by repeating the movement on one side before switching to the other rather than alternating right-left as with weights.
- Stand with your feet shoulder-width apart, knees almost straight without locking them.
- Keep your back straight; do not arch your back or lean forward.
- To be safe, only perform standing leg exercises if you have sufficient balance.
- Inspect the tape before each use for tears.
- You may not be able to complete all the exercises. If your surgeon, cardiologist or other healthcare professional has advised you to avoid certain movements, follow their recommendations and consult us if you have any doubts or questions.
- Aim for one to three sets of 10 to 15 repetitions.
- Exhale during the effort and inhale as you return to your starting position.
FRONT SHOULDER RISE
- Place one end of the band under one foot.
- Hold the other end with the hand on the same side, arm at your side.
- Your thumb should be pointing toward the ceiling.
- Raise your arm in front of you towards the ceiling, up to shoulder height, with your elbow extended.
- Slowly return to your starting position.
- Perform one set on one side, then do the same with the other arm.
LATERAL SHOULDER RISE
- Place one end of the band under one foot.
- Hold the other end with the opposite hand, arms at your sides.
- Your thumb should be pointing toward the ceiling.
- Raise your arm out to the side, to shoulder height, with your elbow extended.
- Slowly return to your starting position.
- Perform one set on one side, then do the same with the other arm.
TRUNK DEVELOPMENT
- Pass the band behind your upper back.
- Hold its ends in your hands in front of your shoulders, elbows bent.
- If the band wraps around your neck during exercise, place the band under your arms, near the armpits, rather than over your arms.
- Extend your arms in front of you to straighten your elbows.
- Bend your elbows to return to your starting position.
SEATED DRAW (MID-BACK)
- Preparation: Sit on the edge of a chair to leave space between your back and the backrest.
- Extend one leg (or both legs) in front of you, letting your heel rest on the floor.
- Place the band under your foot (or both feet) and hold the ends in your hands.
- Keep your elbows in a low position, close to your body.
- Bring your shoulder blades together.
- Bend your elbows and pull back, keep your hands in a low position, close to your thigh.
- Slowly return to your starting position.
T-PULL (UPPER BACK)
- Hold the band in front of you with both hands, arms at shoulder height, elbows almost fully extended, palms facing the floor.
- Make sure your shoulders are relaxed in the down position.
- Bring your shoulder blades together by spreading your arms apart.
- Slowly return to your starting position.
SHOULDER PRESS
- This exercise is easier if done one arm at a time
- Place one end of the band under one foot and hold the other end in your hand on the same side.
- Bend your elbows and place your hands just above your shoulders.
- Stretch your arms toward the ceiling.
- You can also do a set on one side, then do the same with the other arm.
ELBOW FLEXION (BICEPS)
- Place one end of the band under one foot.
- Hold the other end in the hand on the same side with your palms facing forward.
- Bend your elbow to bring your hand closer to your chest.
- Slowly return to your starting position.
- Perform one set on one side, then do the same with the other arm.
ELBOW EXTENSION (TRICEPS)
- Hold one end of the band in one hand, against your hip or at the small of your back.
- Hold the other end in the opposite hand, with your elbow bent in front of your shoulder.
- The tape should go behind your back, like in the picture.
- Unbend your elbow to extend your arm forward.
- Slowly return to your starting position.
- Perform one set on one side, then do the same with the other arm.
KNEE EXTENSION (QUADRICEPS)
- Sit on a chair.
- Attach one end of the strip to one leg of the chair.
- Secure the other end to your foot or ankle on the same side.
- Contract the muscle at the front of the
- thigh and straighten your knee to lift your foot.
- Slowly return to your starting position.
- Perform one set on one side, then do the same with the other leg.
KNEE FLEXION (HAMSTRINGS)
- Stand up, hold onto the back of a chair or a counter.
- Place one end of the band under one foot.
- Secure the other end to your opposite heel/ankle.
- Lift your heel toward your buttocks as high as possible while bending your knee.
- Slowly lower your heel to the ground to return to your starting position.
- Perform one set on one side, then do the same with the other leg.
HIP EXTENSION (BACK MUSCLES AND GLUTES)
- Stand with one hand on the back of a chair, table or railing (not a staircase) to maintain your balance.
- Attach one end of the strip to the leg of a chair/table or to a railing post.
- Secure the other end around your ankle.
- Raise this leg back, keeping your knee straight.
- Make sure to keep your back straight, do not arch your lower back.
- Slowly return to your starting position.
HIP ABDUCTION (LATERAL LEG ELEVATION)
- Stand with one hand on the back of a chair, table or railing (not a staircase) to maintain your balance.
- Attach one end of the strip to the leg of a chair/table or to a railing post.
- Secure the other end around your ankle.
- Raise that leg out to the side, keeping your toes pointed forward.
- Do not tilt or bend your trunk.
- Slowly return to your starting position.